
Welcome! Today it's my turn to make a creation for the Newton's Nook Designs blog and I decided to share a tutorial with you on how to make some decorated glass magnets using NND's Falling Into Autumn stamp set

along with its own little homemade box. I should note that I first got the idea for these magnets from my friend Emily almost two years ago, but I created the box on my own from measuring the dimensions of the glass stones I used for the project. Here is a list of the supplies you will need:
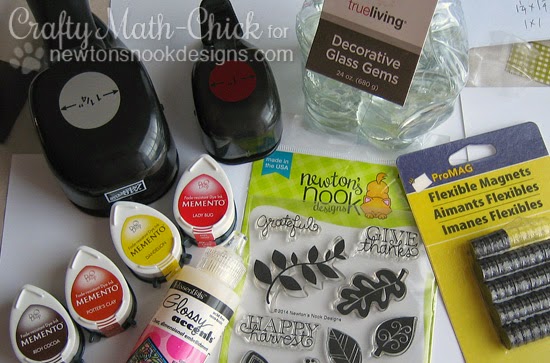
- Newton's Nook Designs 'Falling Into Autumn' stamp set,
- large glass gems (they sell them for $1 at Dollar Tree - I try to find the clear ones that are not iridescent so the images show through more clearly),
- Glossy Accents or some other kind of glue that dries clear,
- round magnets - I used 5/8" diameter magnets and they held just fine, 3/4" would work great as well,
- 1 1/4" circle punch (and a 1" circle punch if you choose to mat them as I did),
- stylus or bone folder (something to score with),
- inks in colors of choice (I selected Dandelion, Ladybug, Potter's Clay and Rich Cocoa by Memento)
- 6 1/2" x 6 1/2" piece of paper for the box,
- patterned papers for side panels if desired (front, back, bottom and top are 4 1/4" x 1 1/4" mats and 4" x 1" DP; sides are 1 1/4" square mats & 1" square DPs), and
- scissors.
First, select the images you want to use and the colors you like best and stamp them. Since these glass gems had diameters of 1 1/2" I needed to make sure the images were smaller than that:

Since the images I selected were on the small side, I punched them out using a 1" circle punch and then punched mats for them in coordinating colors using a 1 1/4" circle punch:

I also did a set with the images embossed in bright colors on a dark background to see how they'd look for comparison:

Next I applied a dollop of Glossy Accents to the center of the flat side of each glass gem about the size of a dime, maybe a little smaller:

Then I applied my stamped circles face down into the glue:

Apply another dollop of Glossy Accents to the centers of the paper circles just slightly smaller than the diameter of the magnets (the glue will spread as the magnet is pressed into the glue):

Gently press the magnets into the glue.

Set them aside to dry a bit while you create the box. Take a 6 1/2" x 6 1/2" peice of cardstock. On one side, score at 1/2", 2", 3 1/2" and 5". Rotate the cardstock 90 degrees and score 1" in from each side (left & right). Position the square so that the thin 1/2" scored section is at the top (that will be the little flap that fits inside the top to close it) and remove the top two sections on both the left & right sides. Cut in 1" along the score lines as indicated in the picture below:

Attach strong adhesive to the three flaps on the left & right sides:


Now decorate the holder any way you like! I stamped images from 'Falling Into Autumn' on the 4" x 1" white strips for the top, front & back (didn't see the point in decorating the bottom of the box, LOL!) and 1" squares for the left & right sides, and matted them with 4 1/4" x 1 1/4" strips & 1 1/4' squares of Yoyo Yellow cardstock:

Adhere to the box and you're done - TA DA!

Here is a close up of the magnet on my fridge:

Thanks so much for taking the time to view my tutorial. I hope you are inspired to give these a try yourself sometime - they are an inexpensive & easy way to make lots of personalized gifts for friends, neighbors, teachers - anyone! Enjoy! Have a great day!
~ Crafty Math Chick
~ Crafty Math Chick
5 comments:
These are absolutely amazing! Thank you for sharing how you made them! ♥
Wonderful tutorial!! Thanks for sharing.
Your magnets are amazing! I would love to try this! It would make a nice gift too!
Thank you so much for your sweet comments on my blog! I had to chuckle when I read your note about all the challenges I enter LOL! The challenges really motivate me and I love to support as many of them as I can. I have a lot of fun with it! After I lost my job 2 1/2 years ago (the company closed, leaving 400 people unemployed, devastating our small town), my cardmaking and the challenges helped keep me from going crazy. I worked there for 29 years. Still haven't found another job, and with my health problems now, I am unable to go back to work. I'm on a very tight budget as you can imagine, so winning a challenge every now and then gives me some new crafty goodies and picks up my spirits. Mostly I win digital images but sometimes other stuff that comes in the mail and that really makes my day and gives me something to look forward to! I really appreciate your kind comments - I enjoy your creative works very much - I'm an avid follower of Newton's Nook so I love seeing what you do with those stamps!
Sending lots of joy and blessings your way!
Kitty
Wow, what a wonderful, rich project x
Hi there sweetie, You always put your very best into your projects! This is awesome - look at the measurements you put onto the template for us! The magnets are so pretty! Thanks for all your hard work ♥
Post a Comment