Friday, November 21, 2014

Newton's Nook Designs ~ Inky Paws Challenge #16

Hello everyone!  It's time for another fun Inky Paws Challenge from Newton's Nook Designs!  Jen is in the holiday spirit a little early and has picked this fun theme for our latest Inky Paws Challenge - Christmas!!


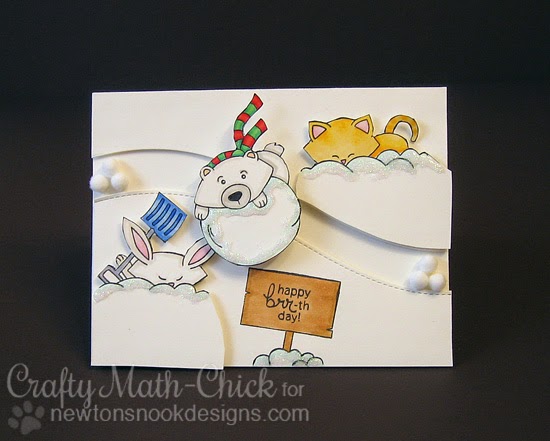
(isn't that wreath pretty?)  I decided to begin on Ty's yearly holiday doggie treat for his neighborhood doggie friends:


Petco has these CUTE doggie treats that look and smell like real Hydrtox cookies.  I first found out about them when Ty was a prize at this year's 'Pooch Plunge'  - they were SO cute!  I was excited when I learned that that came in festive holiday colors this time of year, perfect for puppy gift giving!  I created this little goodie bag using some of last year's collection of MME's holiday 12 x 12 stack and tried to position the 'Noel' in the middle and the 'Happy Howl-i-days' sentiment underneath it using a Word Window punch.  I paper pieced a portion of the paper that has a heart on it for the body of Ty's sweater and thought it would be cute to have him resting on the 'NOEL'.  I took a snowflake wooden  veneer and dragged it across my Ridinghood Red inkpad a few times to give rustic look that matched the treat bag a little better, and stuck a gold pearl by Queen & Co. in the center.  Popped the treat inside and tied the bag up with some Ridinghood Red ribbon and sparkly golden twine and VOILA!  Done!  Now to make about 10 more of these - I need more puppy Oreos too!  LOL!  

Of all the dogs in Jen's CUTE doggie sets, I think this little pup from Canine Christmas looks the most like Ty (though ALL of her pups are wicked cute!!):


Hope you will play along with us!  Jen is giving you THREE weeks to play along this time for a chance to win a gift certificate to the NND store, and if there are more than 15 entries she will pick TWO winners!! - how generous is that?!!

Thanks for stopping by!  Can't wait to see what you create!  

Since I have used Jen's cute critters in my Christmas themed creation I am also entering this goodie bag in Naughty or Nice Challenge's 'Festive Furballs' Challenge (mine is 'nice' - don't you think?).  

~ Crafty Math Chick


Tuesday, November 11, 2014

Newton's Nook Designs November Release - Day 2


Hello Everyone!  Welcome back to the second and final day of Newton's Nook Designs' November release.  Today we are sharing a beautiful snowflake set that Jennifer illustrated inspired by quilling techniques, aptly named 'Beautiful Blizzard':


I SO wanted to quill on my cards using this set!  But alas, I cannot find my quilling kit since our move, so instead I decided to make a pair of CAS cards, the first uses Pool Party, Lost Lagoon and Certainly Celery (and tons of sequins, pearls & rhinestones from a variety of companies):


And the second uses Eggplant Envy, Wisteria Wonder, Pale Plum & Basic Grey:


Then I decided to make a few using an emboss resist technique - I heat embossed several of the snowflake images with white embossing powder on glossy cardstock and then sponged inks of the same color combinations over the top and wiped the excess off with a paper towel.  Here is the one with the aqua color combination:


And here is the one with the purples:


Both of these are actually much more vibrant in real life.  I plan on donating them for Vera's Caring Hearts Christmas Card Drive, collecting cards for residents in nursing homes who might not have much family left or get any cards for Christmas.  

Would you like to win 'Beautiful Blizzard'?
This set will be given away to TWO lucky winners!!

Here's how to win:

Comment on the NND blog and Design Team and Guest blogs (see list below)!  Two winners will be chosen at random from the collective blogs' release posts.  Make sure you check out each of their blogs and comment for your chance to win.  You will not know which blog has been chosen so the more you comment on the better your chances are of winning!  You have until Tuesday, November 11th at 9 pm CDT to comment -- winners will be announced on the blog post on Wednesday, November 19th.

Check out all these awesome Design Team & Guest Blogs below to enter:


Thanks so much for stopping by my blog, your comments mean to much to me.  Shellye's blog is next on the hop, I am sure she has created something spectacular for you!  Enjoy!

~ Crafty Math Chick

Monday, November 10, 2014

Newton's Nook Designs November Release ~ Day 1


Hello Everyone!  Welcome to the first day of Newton's Nook Designs November Release Sneak Peeks.  Today we are sharing creations with an fun new winter animal set - 'Winter Tails':


I saw Winston on that big snowball and perhaps it was the two little curves to the right of the image but I instantly thought 'SPINNER CARD'!  (I thought I was so original but apparently a few of us had the same idea, great minds think alike huh?)  So here is mine (I included three pictures so you could 'see' the movement but Newton and his bunny pal weren't blocked):


My little nephew's brrr-thday is in December, so this card will be perfect for him!  Instead of using the word window punch to create the slot as I have in the past I used a curvy die and simply separated the top and bottom pieces and used some pom poms to create little snowball piles to keep Winston from rolling right off the card, LOL!  I added touches of iridescent glitter glue to the snowball and snowdrifts and in real life, they really sparkle!  I hope you like it!

Would you like to win 'Winter Tails'?
This set will be given away to TWO lucky winners!!

Here's how to win:

Comment on the NND blog and Design Team and Guest blogs (see list below)!  Two winners will be chosen at random from the collective blogs' release posts.  Make sure you check out each of their blogs and comment for your chance to win.  You will not know which blog has been chosen so the more you comment on the better your chances are of winning!  You have until Tuesday, November 11th at 9 pm CDT to comment -- winners will be announced on the blog post on Wednesday, November 19th.

Check out all these awesome Design Team & Guest Blogs below to enter:


Thanks so much for stopping by my blog, your comments mean to much to me.  Shellye's blog is next on the hop, I am sure she has created something spectacular for you!  Enjoy!
  
~ Crafty Math Chick


Sunday, November 9, 2014

Cupcake Inspirations Challenge with Newton's Nook Designs

Hello!  A cool announcement - Jennifer of Newton's Nook Designs is sponsoring this week's Cupcake Inspirations Challenge, so I certainly hope you will play along for a chance to some NND crafty goodness!  Here is the cool inspiration pic:


To me the cupcake tops reminded me of heat embossing, so I used NND's Falling Into Autumn set:


To create this card:


I decided to keep this one simple & elegant.  I never seem to have enough 'thank you' cards in my stash, so I was inspired to use 'grateful' as my sentiment.  I embossed the pretty silhouette oak leaf image using Tangerine Tango embossing powder with Versamark (which seems to work MUCH better than the embossing pad I was previously using on projects!) on Chocolate Chip paper and created a simple scalloped punched border to frame the panel before adhering it to a Close to Cocoa (MISS this color!) card base.  

Hope you will play along with us!  And just a heads up - keep your eyes open for sneak peeks of NEW NND sets coming up Monday!!  Happy weekend!

~ Crafty Math Chick

Wednesday, November 5, 2014

Decorated Glass Magnets with Newton's Nook Designs


Welcome!  Today it's my turn to make a creation for the Newton's Nook Designs blog and I decided to share a tutorial with you on how to make some decorated glass magnets using NND's Falling Into Autumn stamp set


along with its own little homemade box.  I should note that I first got the idea for these magnets from my friend Emily almost two years ago, but I created the box on my own from measuring the dimensions of the glass stones I used for the project.  Here is a list of the supplies you will need:


  • Newton's Nook Designs 'Falling Into Autumn' stamp set,
  • large glass gems (they sell them for $1 at Dollar Tree - I try to find the clear ones that are not iridescent so the images show through more clearly),
  • Glossy Accents or some other kind of glue that dries clear,
  • round magnets - I used 5/8" diameter magnets and they held just fine, 3/4" would work great as well,
  • 1 1/4" circle punch (and a 1" circle punch if you choose to mat them as I did), 
  • stylus or bone folder (something to score with),
  • inks in colors of choice (I selected Dandelion, Ladybug, Potter's Clay and Rich Cocoa by Memento)
  • 6 1/2" x 6 1/2" piece of paper for the box, 
  • patterned papers for side panels if desired (front, back, bottom and top are 4 1/4" x 1 1/4" mats and 4" x 1" DP; sides are 1 1/4" square mats & 1" square DPs), and 
  • scissors.

First, select the images you want to use and the colors you like best and stamp them.  Since these glass gems had diameters of 1 1/2" I needed to make sure the images were smaller than that:


Since the images I selected were on the small side, I punched them out using a 1" circle punch and then punched mats for them in coordinating colors using a 1 1/4" circle punch:


I also did a set with the images embossed in bright colors on a dark background to see how they'd look for comparison:


Next I applied a dollop of Glossy Accents to the center of the flat side of each glass gem about the size of a dime, maybe a little smaller:


Then I applied my stamped circles face down into the glue:


Apply another dollop of Glossy Accents to the centers of the paper circles just slightly smaller than the diameter of the magnets (the glue will spread as the magnet is pressed into the glue):


Gently press the magnets into the glue.  


Set them aside to dry a bit while you create the box.  Take a 6 1/2" x 6 1/2" peice of cardstock.  On one side, score at 1/2", 2", 3 1/2" and 5".  Rotate the cardstock 90 degrees and score 1" in from each side (left & right).  Position the square so that the thin 1/2" scored section is at the top (that will be the little flap that fits inside the top to close it) and remove the top two sections on both the left & right sides.  Cut in 1" along the score lines as indicated in the picture below: 


Attach strong adhesive to the three flaps on the left & right sides:


 Fold & adhere:


Now decorate the holder any way you like!  I stamped images from 'Falling Into Autumn' on the 4" x 1"  white strips for the top, front & back (didn't see the point in decorating the bottom of the box, LOL!) and 1" squares for the left & right sides, and matted them with 4 1/4" x 1 1/4" strips & 1 1/4' squares of Yoyo Yellow cardstock:


Adhere to the box and you're done - TA DA!  


Here is a close up of the magnet on my fridge:


Thanks so much for taking the time to view my tutorial.  I hope you are inspired to give these a try yourself sometime - they are an inexpensive & easy way to make lots of personalized gifts for friends, neighbors, teachers - anyone!  Enjoy!  Have a great day!

~ Crafty Math Chick