Friday, September 26, 2014

Newton's Nook Designs ~ Inky Paws Challenge #14


Hello everyone!  It's time for a new Inky Paws Challenge from Newton's Nook Designs!  This time Jennifer decided upon a color challenge:


I used Wagon of Wishes and Winged Wishes to create this card using these colors:


I wanted to just reach out and cuddle the little kitty in the inspiration picture, so I made sure to color the kitten on my card in grey hues with my Copic markers.  I thought it would look pretty if the pretty little birdies were holding up a sentiment banner over him.  The green gingham patterned paper is from the 'Pumpkin Patch' stack by American Crafts and I paired it with some DCWV glittered yellow paper and Stampin' Up!'s Pumpkin Pie which was punched with a cool pumpkin border punch by EK Success that I found for an amazing price at Marshalls last year.  The maple leaves bling is by the paper Studio from Hobby Lobby.

Additional Challenge:


Thanks so much for taking the time to look at my card.  Make sure to stop by the Newton's Nook Designs' blog and see more inspirational samples from my talented teammates.  I hope you will play along with us!  If you do, you have a chance to win a gift certificate to Newton's Nook Designs - isn't that awesome?!!   Newton's Nook Designs images are required but Jen generously provided some freebies on the blog that you can print out so you can play along too, so please -- join us!  I can't wait to see what you create!

~ Crafty Math Chick

Thursday, September 18, 2014

Newton's Nook Designs September Release: Final Day


Welcome back for the 4th and final day of Newton's Nook Designs' September Release.  Hasn't this release been TERRIFIC?!!  Jennifer saved a cute foodie set for the last day of reveals that mademy mouth water the first time I saw it called 'Apple Delights':


At first you might think it is just a set for fall, but it is really quite versatile and can be used to make cards and projects for Valentines Day, anniversaries, Thanksgiving, back to school, teacher appreciation gifts, little love notes - so many fun possibilities!

Since I LOVE spiced hot apple cider so much I decided to make a packet holder.  I have seen some cute tea bag holders around, but the apple cider packets are larger than the tea bags, so I played around with the design until I found one I liked.  Here is what it looks like closed:


Here is a close up of the front of the packet with the cute mug of apple cider:


And here are some shots of the inside, so you can see how the packets are tucked inside:


And a close up of the sentiment (made my own homemade patterned paper using the solid apple silhouette stamp in the set):


I thought this would be so cute to tuck into my neighbors' mailboxes for a little fall pick-me-up when the weather is just beginning to get that ever so slight chill in the air.  What do you think?

I made a short video showing off this project in a video HERE.

This set also inspired me to make caramel apples for the very first time:


(I admit I am a bit of an 'apple snob' - Cortlands are my favorite but I can't find any around here (they are AWESOME for eating AND for pies!  Do YOU have a favorite kind of apple?  If so, what is it?), but the commissary had these BIG BEAUTIFUL Granny smiths apples and the Macintosh are starting to harvest as well so I grabbed some of those too).  Here is a close up of the tag I colored with Copic markers and adorned with Glossy Accents on the caramel, a homemade enamel dot, some Pretty Post sequins and some star 'Celebrate It' sequins from Michaels:


 Making caramel apples was a lot easier than I expected, and FUN too, and the apples taste GREAT!!  I just followed the directions on the packet (note - allow a little time to unwrap all those caramels and if you are going to add toppings have them right there, because that caramel hardens surprisingly fast!  I was able to dunk a few into chopped walnuts pretty quickly, but when I went to sprinkle some fall sprinkles on the tops of a few after merely setting them down they bounced right off!  Oh, and the package only covers five apples, so if you want more than that, buy more apples!  LOL!!)  I want to go and make some more now!  LOL!  Thanks for the cool inspiration Jen!  I wonder how difficult candy apples are to make... Hmmm...

Would you like to win 'Apple Delights'?
This set will be given away to TWO lucky winners!!

Here's how to win:

Comment on the NND blog and Design Team and Guest blogs (see list below)!  Two winners will be chosen at random from the collective blogs' release posts.  Make sure you check out each of their blogs and comment for your chance to win.  You will not know which blog has been chosen so the more you comment on the better your chances are of winning!  You have until Thursday, September 18th at 9 pm Central Daylight Time to comment -- winners will be announced on the blog post on Friday, September 19th.

Check out all these awesome Design Team & Guest Blogs below to enter:


Thanks so much for stopping by!  Shellye is next on our hop, I am sure she has created something spectacular for you to see!  Enjoy!


Apple Cider Packet - Challenges Entered:

Caramel Apple & Tag - Challenges Entered:


~ Crafty Math Chick

Wednesday, September 17, 2014

Newton's Nook Designs September Release: Day 3


Welcome back for the third day of reveals for Newton's Nook Designs.  Today we are showing off this cool new Halloween set with lots of cool silhouettes images to make you own cool spooky Halloween scenes called 'Spooky Street':


I was psyched when Jen sent us this set because I don't have a lot of silhouette sets and they are SO much fun to use with brayered backgrounds, so that is the kind of card I made:


I actually got the idea this card from a card I received several years ago from one of my crafting friends, Emily, which used a different set of course, but had this cool brayered background behind solid black Halloween images, a similar layout, and was the impetus behind me searching high and low for that EK Success Boo border punch (LOL, I love it!).  I really like how this card came out, in real life, the center panel looks luminous, like it is glowing, VERY cool!  I used an ultra fine black gel pen to draw a line from the 'A' in 'happy HAUNTS' to the spider so he (she?  it?) looks like it is dangling from the sentiment.

Would you like to win 'Spooky Street'?
This set will be given away to TWO lucky winners!!

Here's how to win:

Comment on the NND blog and Design Team and Guest blogs (see list below)!  Two winners will be chosen at random from the collective blogs' release posts.  Make sure you check out each of their blogs and comment for your chance to win.  You will not know which blog has been chosen so the more you comment on the better your chances are of winning!  You have until Thursday, September 18th at 9 pm Central Daylight Time to comment -- winners will be announced on the blog post on Friday, September 19th.

Check out all these awesome Design Team & Guest Blogs below to enter:


Thanks so much for stopping by!  Shellye is next on our hop, I am sure she has created something spectacular for you to see!  Enjoy!


Additional challenges:

~ Crafty Math Chick

Tuesday, September 16, 2014

Newton's Nook Designs September Release: Day 2


Welcome back for Day 2 of reveals for Newton's Nook Designs' September Release!  Today we are showing off 'Falling into Autumn' which has autumn leaves in a variety of shapes & sizes in beautiful silhouette: 


Autumn is my favorite season, SO many BEAUTIFUL colors, and I love the look of heat embossing, so, since I have a ton of embossing powders in lots of different colors I decided to create the following card using a bunch of them (Zing's Rouge & Mustard, Stampin' up!'s Tangerine Tango & Gold Glory) and show off lots of the fun leaf shapes:


I personally love how the vibrant colors pop against the dark chocolate background!  Nice and postage friendly too!

Would you like to win 'Falling Into Autumn'?
This set will be given away to TWO lucky winners!!

Here's how to win:

Comment on the NND blog and Design Team and Guest blogs (see list below)!  Two winners will be chosen at random from the collective blogs' release posts.  Make sure you check out each of their blogs and comment for your chance to win.  You will not know which blog has been chosen so the more you comment on the better your chances are of winning!  You have until Thursday, September 18th at 9 pm Central Daylight Time to comment -- winners will be announced on the blog post on Friday, September 19th.

Check out all these awesome Design Team & Guest Blogs below to enter:


Thanks so much for stopping by!  Shellye is next on our hop, I am sure she has created something spectacular for you to see!  Enjoy!


Additional Challenges:


~ Crafty Math Chick

Monday, September 15, 2014

Newton's Nook Designs' September Release - Day 1


Yaay!  Let the sneak peeks for Newton's Nook Designs' new sets begin!  Today we are revealing 'Newton's Perfect Pumpkin' - an adorable set with Newton showing off his pumpkin for you to decorate for him with all kinds of creative options:


Since there were so many cute ways to decorate Newton's pumpkin I figured, 'Why choose?' and used ALL of the in this interactive card:


See the orange & purple dial on the right side of the card?  Turn it and you can decide which of the faces you like best!  Pretty cool, huh?  I made a short video demonstrating how the interactive card works if you'd like to check it out HERE.  

I always enjoiy making fun Halloween treats to give away, so I also decided to make a festive little Tic Tac holder using this set as well:


Would you like to win 'Newton's Perfect Pumpkin'?
This set will be given away to TWO lucky winners!!

Here's how to win:

Comment on the NND blog and Design Team and Guest blogs (see list below)!  Two winners will be chosen at random from the collective blogs' release posts.  Make sure you check out each of their blogs and comment for your chance to win.  You will not know which blog has been chosen so the more you comment on the better your chances are of winning!  You have until Thursday, September 18th at 9 pm Central Daylight Time to comment -- winners will be announced on the blog post on Friday, September 19th.

Check out all these awesome Design Team & Guest Blogs below to enter:


Thanks so much for stopping by!  Shellye is next on our hop, I am sure she has created something spectacular for you to see!  Enjoy!


Additional Challenges:


~ Crafty Math Chick
Wednesday, September 10, 2014

Electric Tea Light Luminary Tutorial with Newton's Nook Designs


Welcome back friends & followers!  Today I am going to show you how to make a cute little luminary using an electric tea light and Newton's Nook Designs' 'Boo Crew' set:


Step 1: Assemble your supplies:


  • Boo Cream set by Newton's Nook Designs,
  • 5" x 2 1/2 " piece of black cardstock,
  • 5" x 1/2" piece of orange cardstock,
  • 2" x 1 3/4" piece of vellum,
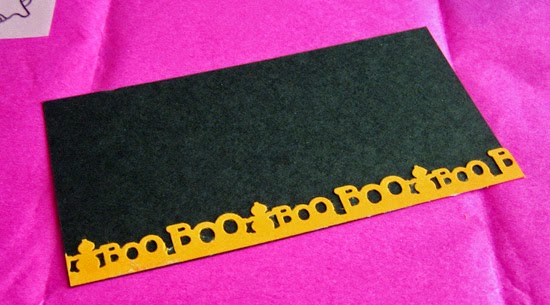
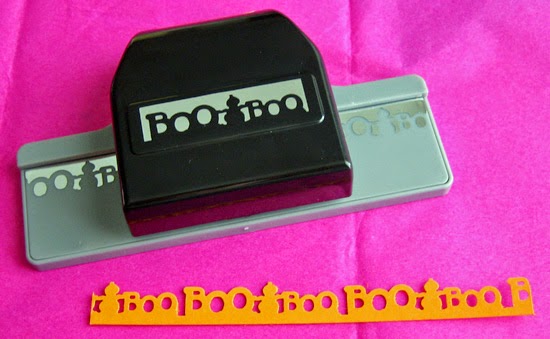
  • border punch (I used this 'Boo' one by EK Success),
  • adhesive (I use Tombow Mono Adhesive tape),
  • Scotch tape (to adhere vellum and secure back of luminary),
  • markers to color in kitty (I used Bic Mark Its in Peach Parfait & Summer Melon),
  • black & white inks (not pictured - I used Memento Tuxedo Black & Palette New Canvas),
  • craft knife & mat (not pictured), and
  • an electric tea light.


Step 2: punch border from orange cardstock strip:


Step 3: Stamp 'ghost kitty' image from Newton's Nook Designs 'Boo Crew' set on vellum using black ink (I have this step early so it has a little time to dry and won't smudge):


Step 4: Color in ears, feet & tail if desired.  I used Bic Mark Its in Peach Parfait for a light orangey color like the real-life Newton kitty, and peach parfait for the ear spaces:


Step 5:  Attach orange 'Boo' border to black strip of cardstock:


Step 6: Using a white ink, stamp the ghost kitty image again above the Boo border (in retrospect, I wish I had stamped a bit higher so the tea light would not be visible at the bottom - to avoid this you could measure the height of the tea light and make sure you stamp higher than that measurement from the Boo border on your cardstock, for mine, it would have been just another 1/4" higher):


Step 7: Once you are sure the white outline image is dry, cut the image out around the edges; this will create your opening for the vellum image.  I personally chose to leave a border so the black outline image of the ghost kitty would show through.  I used a craft knife & mat underneath:


When you are done it will look like this:


Step 8: Flip your strip of black cardstock over to the side that does not have the border attached and align the vellum stamped ghost kitty image over the opening - note, the stamped side will face down or away from you (I personally hold the strip and vellum piece up to a window or light source during alignment).  When you are satisfied with the position tape in place with Scotch tape - make sure you are taping on the side without the border, that is that back, which will be inside your luminary.


Step 9: Wrap your cardstock, border side out, around the tea light (note - it helps if you curl the cardstock with your fingers a bit so the paper curves better).  Secure in place with really strong tape (if you don't want it to show) or Scotch tape (which is what I did, it is in the back and no one will see it anyway).  And.... VOILA!  Electric tea light luminary complete!


(As a safety precaution, I would not recommend you leave these on when you are not home or unattended)

Easy peasy right?  And cute huh?  YOu could make a bunch of these and put them in the windows of your house on Halloween!  How fun & festive would that be?!!

Thanks so much for stopping by.  I hope you liked my tutorial.  Would you like to see more of these from me in the future?  I'd love to know your thoughts.

Have a crafty day!


~ Crafty Math Chick