Showing posts with label Treat holders. Show all posts

Friday, September 23, 2016

Newton's Nook Designs' Inky Paws Challenge #36 ~ Halloween


Hello everyone!  It is time for another FUN Inky Paws Challenge from Newton's Nook Designs!  The theme for this challenge is 'Halloween' (Booooooooo!)


I opted to make some treat holders rather than a card and give some of our older sets a little love in my project:  

Halloween Treat Boxes by Crafty Math Chick | Newton's Perfect Pumpkin, Happy Halloweenie and Spooky Street Stamp sets by Newton's Nook Designs

I used some petite pre-cut orange treat boxes I had in my stash for years, cut a little patterned paper from The All Seasons stack by the Paper Studio from Hobby Lobby and used some of the smaller accent images from NND's new Dress Up Doxies (I paper pieced the little pumpkin treat bucket so it would stand out against the green punched circle), Spooky Street, and Newton's Perfect Pumpkin stamp sets along with a few festive shaped sequins I purchased at Michaels two years ago.  Purr-fect for your favorite halloween candies no?  

Thanks so much for stopping by!  Hope you will play along too because the Challenge winner will receive a $10 store credit to our online store and a Inky Paws Challenge Top Pick Badge to add to your blog! If we get more than 15 participants, we will choose two winners so be sure to tell your friends to play along! 

You have TWO WEEKS to play along - Deadline to enter is Friday, October 7th, 2016 at Midnight CST. The winners will be announced on the NND blog.  Good luck!  And have a great weekend!


~ Crafty Math Chick


Friday, February 5, 2016

Newton's Nook Designs' Sweet Treats Blog Hop


Hello everyone!  Welcome to the 2016 Newton's Nook Designs' Sweet Treats Blog Hop!  Jen thought it would be fun to inspire you all with some homemade treat holders featuring her adorably illustrated stamps just in time to whip up some Valentine's Day Treats!  

I thought I would show you something a little different and make a few non-traditional Valentine treats.  I hope you like them!

Anyone who knows me knows I am a HUGE fan of EVERYTHING 'DOG' - so I couldn't miss out on the opportunity to make and show off a Valentine for your favorite canine (OOOH!  That rhymes!  Jen - note for future sentiments!  LOL!)
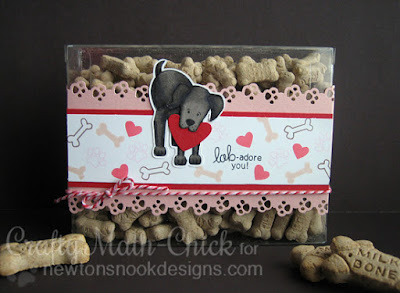


Lab-Adore Clear Valentine Biscuit Box by Crafty Math Chick | Fetching Friendship by Newton's Nook Designs

I took one of those clear acrylic card boxes designed to hold  a set of 4.25" x 5.5" cards & envelopes and filled it with mini Milk Bone Biscuits (yes, Ty was very attentive of his Mommy whilst I created this project, LOL!).  I used a Fiskars paw print border punch on both sides of a strip of Blushing Bride cardstock.  Then I took a strip of white cardstock and created a patterned background using the heart, outline paw print (which is stamped in pink and extremely light in this photo), and solid & outline bone images along with the 'LAB-Adore you!' sentiment, perfect for Valentine's Day!  Then I took the sweet Labrador image from 'Fetching Friendship' that had a tennis ball in his mouth and 'replaced' it with a red heart I punched out by gluing the heart in the appropriate place and paper piecing the top part of his head & upper jaw (which had been stamped separately, colored and fussy cut out) over it - TA DA!  Instant way to make this cute puppy hold anything in his mouth!  Adhered them together and wrapped them around the box as a decorative band - VOILA!  Canine Valentine complete!  :)

I purchased 'Campfire Tails' a long time ago and still had yet to give it any love, so I looked for a way to create a masculine valentine using it.  I have always found masculine valentines to be such a challenge - I know my husband doesn't like seeing pink on cards, so you have to get creative to come up with things to appeal to the men in our lives.  I saw the 'hooked on you' sentiment and thought 'How perfect would this be to pair with Pepperidge Farm Goldfish crackers or Swedish fish?!!'  Not too 'girly' right?  So that is what I did, and since I am a very indecisive person and couldn't decide which snack would appeal to my viewers most - I created toppers for both (plus - double snackage for us that way right?  LOL!)


Winston's Fisherman Valentine Treats by Crafty Math Chick | Campfire Tails by Newton's Nook Designs

So, which coloring of Winston do you like better?  Which treat is your favorite?  A little handy tip - if you buy the small box (designed for home movies for 98 cents at the time of this posting?) the fish come in a little sealed plastic bag already - I just took that (it measured 3.75" wide) and folded one end over and made a topper for it - no reason to simply empty it into an additional plastic baggie, right?  (and am I the only one surprised that is all the Swedish fish you get from such a big box?... just curious)


Would you like to win a $10 store credit to Newton's Nook Designs?
We're giving them out to TWO lucky winners!!

Here's how to win:


Comment on the NND blog and Design Team and Guest blogs (see list below)!  Two winners will be chosen at random from the collective blogs' release posts.  Make sure you check out each of their blogs and comment for your chance to win.  You will not know which blogs have been chosen, so the more you comment on the better your chances are of winning!  You have until Sunday, February 7th at 9 pm CDT to comment -- winners will be announced on the blog post on Monday, February 8th.


Check out all these awesome Design Team & Guest Blogs below to enter:


Newton's Nook Designs
Lydia Evans
Larissa Heskett
Samantha Mann
Crafty Math-Chick
Jess Gerstner
Stephanie Muzzulin
Danielle Pandeline
Nina-Marie Trapani
Kimberly Rendino
Yukari Yoshioka

Well I hope you liked my projects, even if they were a little different.  Jess Gerstner is next on the hop, I am sure she has created something spectacular for you to see!  Enjoy!

~ Crafty Math Chick

Monday, February 2, 2015

Newton's Nooks Designs' Sweet Treats Blog Hop


Hello everyone!  Welcome to the 2015 Newton's Nook Designs' Sweet Treats Blog Hop!  Jen thought it would be fun to inspire you all with some homemade treat holders featuring her adorably illustrated stamps just in time to whip up some Valentine's Day Treats!

Since I LOVE making treat holders, I have created a variety of styles for your viewing pleasure today.  The first, one of my favorites, the Ghirardelli box  - perfectly designed to hold 3 decadent Ghirardelli chocolate squares:


I stamped and cut out the wagon from NND's Wagon of Wishes set


and loaded it up with lot punched hearts in assorted shapes & sizes with a few teenie heart-shaped sequins thrown in for a touch of shine and added the 'loads of' sentiment on the outside and 'love' from the NND Flirty Flamingo's set on the inside.

For my second treat holder, I went with the tried and true mini pizza box  - which is perfect for holding treats of all shapes & sizes:


This cute little raccoon from NND's Sweetheart Tails


hides lots of Lindor truffle hearts inside with 'You stole my heart' stamped on the rim (thought it was cute that the candies were shaped like hearts for this sentiment).

My last creation was made with folks who might think non-candy treats are far more sweet - people who are diabetic perhaps, etc.  I made a pencil holder using some pencils from a cute Valentine themed $1 pack and the cute owl from Sweetheart Tails as well.


The sleeve also holds 8 or 7 Pixie Stix quite nicely, I described how to make these in THIS POST.

Since my projects feature animals I am also entering them in this week's Mod Squad's 'All About Animals' Challenge. 

Know what the greatest thing is about all the treat holders in my stop on the hop?  They are ALL WICKED EASY to make!  Seriously!  Each one was cranked out in a matter of minutes, then you just spend as long as you like embellishing them up!  

Would you like to win a $10 gift certificate to Newton's Nook Designs?
We're giving them out to TWO lucky winners!!

Here's how to win:

Comment on the NND blog and Design Team and Guest blogs (see list below)!  Two winners will be chosen at random from the collective blogs' release posts.  Make sure you check out each of their blogs and comment for your chance to win.  You will not know which blogs have been chosen, so the more you comment on the better your chances are of winning!  You have until Wednesday, February 4th at 9 pm CDT to comment -- winners will be announced on the blog post on Thursday, February 5th.

Check out all these awesome Design Team & Guest Blogs below to enter:


Crafty Math-Chick (<-- You are here)

Jess Moyer is the next stop of the hop, I am sure she has created something spectacular for you to see!  Enjoy - and good luck!

~ Crafty Math Chick

Friday, November 21, 2014

Newton's Nook Designs ~ Inky Paws Challenge #16

Hello everyone!  It's time for another fun Inky Paws Challenge from Newton's Nook Designs!  Jen is in the holiday spirit a little early and has picked this fun theme for our latest Inky Paws Challenge - Christmas!!


(isn't that wreath pretty?)  I decided to begin on Ty's yearly holiday doggie treat for his neighborhood doggie friends:


Petco has these CUTE doggie treats that look and smell like real Hydrtox cookies.  I first found out about them when Ty was a prize at this year's 'Pooch Plunge'  - they were SO cute!  I was excited when I learned that that came in festive holiday colors this time of year, perfect for puppy gift giving!  I created this little goodie bag using some of last year's collection of MME's holiday 12 x 12 stack and tried to position the 'Noel' in the middle and the 'Happy Howl-i-days' sentiment underneath it using a Word Window punch.  I paper pieced a portion of the paper that has a heart on it for the body of Ty's sweater and thought it would be cute to have him resting on the 'NOEL'.  I took a snowflake wooden  veneer and dragged it across my Ridinghood Red inkpad a few times to give rustic look that matched the treat bag a little better, and stuck a gold pearl by Queen & Co. in the center.  Popped the treat inside and tied the bag up with some Ridinghood Red ribbon and sparkly golden twine and VOILA!  Done!  Now to make about 10 more of these - I need more puppy Oreos too!  LOL!  

Of all the dogs in Jen's CUTE doggie sets, I think this little pup from Canine Christmas looks the most like Ty (though ALL of her pups are wicked cute!!):


Hope you will play along with us!  Jen is giving you THREE weeks to play along this time for a chance to win a gift certificate to the NND store, and if there are more than 15 entries she will pick TWO winners!! - how generous is that?!!

Thanks for stopping by!  Can't wait to see what you create!  

Since I have used Jen's cute critters in my Christmas themed creation I am also entering this goodie bag in Naughty or Nice Challenge's 'Festive Furballs' Challenge (mine is 'nice' - don't you think?).  

~ Crafty Math Chick


Wednesday, October 8, 2014

Apple Delights Keurig k-cup Holder with Newton's Nook Designs


Hello!  With the lovely autumn weather arriving I have been craving all kinds of apples products - including cider, especially since Newton's Nook Designs' 'Apple Delights' set came out recently:


I have seen lots of folks make these cute Keurig k-cup holders as gifts so I figured I would try my hand at it when I spied this at the grocery store:


I figured it was a sign.  I am not a coffee drinker (I know, 'GASP!' right?) but I am all over hot cider, tea and hot cocoa).  I actually decided make two holders and attach them back-to-back (I found the symmetry visually appealing).  To make a double k-cup holder, you will need the following supplies:


  • Newton's Nook Designs' 'Apple Delights' stamp set 
  • two slices of 7" by 10" cardstock for the base
  • four slices of 1 3/4" x 3 3/4" patterned paper for the four sides
  • two slices of  1 1/4" x 3 3/4" patterned paper (if you wish to decorate the handles)
  • 1 3/4" circle punch
  • oval punch for handle
  • Memento Tuxedo Black inkpad
  • Copic Markers of choice (I used R24, R27 & R29 for the apple)
  • stylus or something to score with
  • scissors
  • scrappy tape or super sticky tape adhesive
  • k-cups
  • other embellishments as desired

First you take the 7"x10" piece of cardstock and holding it with the 7" side across, score 1 1/2" from each side, leaving you a 4" space in the middle.  Then turn the cardstock 90 degrees so that the 10" side is horizontal and score at 1/2", 2 1/2", 4 1/2" and 6 1/2".  Cut each of these scores to where they intersect with the 1 1/2" score lines in the other direction and cut out sections at the the four corners entirely, like this:


(I think you can click on the above picture for a larger image if this is difficult for you to read).  The solid lines indicate a cut and dotted lines indicate scoring.  Once everything is scored and cut and the corners are removed it should look like this:


The holes are punched in the center rectangle above that thin 1/2" strip.  I punched a few 1 3/4" circles from a piece of scrap paper to help me determine where I wanted to position the holes and made tiny markings to help facilitate punching in the correct location, then punched them out:


Remember - the above steps need to be repeated for each of the two cardstock bases when making a double holder.  Next, I punched a scrap piece of paper in an oval shape as well to help me determine where I wanted the handle to be placed (the horizontal line helped me make sure the oval wasn't crooked):


Since I am making a double holder I matched up the handle I just punched with the second piece of 7" x 10" piece of cardstock and traced the hole where the handle was so they line up when they were attached back to back at the end:


After that I attached the patterned paper slices to the fronts and handles of each of the holders (it is easier to do when you are working with flat pieces of cardstock, before adhering all the flaps):


Next, use your scrappy tape or another adhesive to assemble each holder - the little 1/2" flap will be folded onto the base under the handle, and it should look like this:


Attach these two holders back to back, and adhere the remaining two slices of 1 3/4" x 3 3/4" patterned paper to the two sides:


Then all you have left to do is embellish it as you choose and fill it with k-cups!  VOILA!


I'd like to thank my friends Lori and Diane who inspired me with their creations.  I hope mine will inspire you to make one of your own!  If you do, I hope you will come back with a link to show me.

Additional Challenge:
Simon Says Stamp Monday Challenge: Fall (did you know Simon Says Stamp also carries Newton's Nook Designs?  They do!!)

Thanks so much for stopping by!  Have a great day!

~ Crafty Math Chick

Thursday, September 18, 2014

Newton's Nook Designs September Release: Final Day


Welcome back for the 4th and final day of Newton's Nook Designs' September Release.  Hasn't this release been TERRIFIC?!!  Jennifer saved a cute foodie set for the last day of reveals that mademy mouth water the first time I saw it called 'Apple Delights':


At first you might think it is just a set for fall, but it is really quite versatile and can be used to make cards and projects for Valentines Day, anniversaries, Thanksgiving, back to school, teacher appreciation gifts, little love notes - so many fun possibilities!

Since I LOVE spiced hot apple cider so much I decided to make a packet holder.  I have seen some cute tea bag holders around, but the apple cider packets are larger than the tea bags, so I played around with the design until I found one I liked.  Here is what it looks like closed:


Here is a close up of the front of the packet with the cute mug of apple cider:


And here are some shots of the inside, so you can see how the packets are tucked inside:


And a close up of the sentiment (made my own homemade patterned paper using the solid apple silhouette stamp in the set):


I thought this would be so cute to tuck into my neighbors' mailboxes for a little fall pick-me-up when the weather is just beginning to get that ever so slight chill in the air.  What do you think?

I made a short video showing off this project in a video HERE.

This set also inspired me to make caramel apples for the very first time:


(I admit I am a bit of an 'apple snob' - Cortlands are my favorite but I can't find any around here (they are AWESOME for eating AND for pies!  Do YOU have a favorite kind of apple?  If so, what is it?), but the commissary had these BIG BEAUTIFUL Granny smiths apples and the Macintosh are starting to harvest as well so I grabbed some of those too).  Here is a close up of the tag I colored with Copic markers and adorned with Glossy Accents on the caramel, a homemade enamel dot, some Pretty Post sequins and some star 'Celebrate It' sequins from Michaels:


 Making caramel apples was a lot easier than I expected, and FUN too, and the apples taste GREAT!!  I just followed the directions on the packet (note - allow a little time to unwrap all those caramels and if you are going to add toppings have them right there, because that caramel hardens surprisingly fast!  I was able to dunk a few into chopped walnuts pretty quickly, but when I went to sprinkle some fall sprinkles on the tops of a few after merely setting them down they bounced right off!  Oh, and the package only covers five apples, so if you want more than that, buy more apples!  LOL!!)  I want to go and make some more now!  LOL!  Thanks for the cool inspiration Jen!  I wonder how difficult candy apples are to make... Hmmm...

Would you like to win 'Apple Delights'?
This set will be given away to TWO lucky winners!!

Here's how to win:

Comment on the NND blog and Design Team and Guest blogs (see list below)!  Two winners will be chosen at random from the collective blogs' release posts.  Make sure you check out each of their blogs and comment for your chance to win.  You will not know which blog has been chosen so the more you comment on the better your chances are of winning!  You have until Thursday, September 18th at 9 pm Central Daylight Time to comment -- winners will be announced on the blog post on Friday, September 19th.

Check out all these awesome Design Team & Guest Blogs below to enter:


Thanks so much for stopping by!  Shellye is next on our hop, I am sure she has created something spectacular for you to see!  Enjoy!


Apple Cider Packet - Challenges Entered:

Caramel Apple & Tag - Challenges Entered:


~ Crafty Math Chick

Monday, September 15, 2014

Newton's Nook Designs' September Release - Day 1


Yaay!  Let the sneak peeks for Newton's Nook Designs' new sets begin!  Today we are revealing 'Newton's Perfect Pumpkin' - an adorable set with Newton showing off his pumpkin for you to decorate for him with all kinds of creative options:


Since there were so many cute ways to decorate Newton's pumpkin I figured, 'Why choose?' and used ALL of the in this interactive card:


See the orange & purple dial on the right side of the card?  Turn it and you can decide which of the faces you like best!  Pretty cool, huh?  I made a short video demonstrating how the interactive card works if you'd like to check it out HERE.  

I always enjoiy making fun Halloween treats to give away, so I also decided to make a festive little Tic Tac holder using this set as well:


Would you like to win 'Newton's Perfect Pumpkin'?
This set will be given away to TWO lucky winners!!

Here's how to win:

Comment on the NND blog and Design Team and Guest blogs (see list below)!  Two winners will be chosen at random from the collective blogs' release posts.  Make sure you check out each of their blogs and comment for your chance to win.  You will not know which blog has been chosen so the more you comment on the better your chances are of winning!  You have until Thursday, September 18th at 9 pm Central Daylight Time to comment -- winners will be announced on the blog post on Friday, September 19th.

Check out all these awesome Design Team & Guest Blogs below to enter:


Thanks so much for stopping by!  Shellye is next on our hop, I am sure she has created something spectacular for you to see!  Enjoy!


Additional Challenges:


~ Crafty Math Chick

Saturday, August 31, 2013

Waltzingmousestamps Pajama Party!

(Before I get to the pajama party festivities please let me know if you are interested in helping out little Taco Papacito - see this post here - he still needs a foster home or a forever home and I have heard from several stamping companies kind enough to donate supplies for a fundraising blog hop to help cover his eye surgery - thank you!!)
Today I am playing along with Waltzingmouse Stamps' Pajama Party Challenges (which has been challenging to do with my mind on poor little Taco, so if you think this work is not quite my best, you will know why.)  I used my new 'Ocean Bound' set on three of these cards, which I was lucky enough to win as blog candy (Thanks Claire & Lynn!!).  The first challenge we were asked to 'tie a knot' so I used some thick, rough twine and created this card:
 (please click on the photo for clearer resolution).  It is based on this week's 'Seize the Sketch'... sketch
I used a Fiskars wave border punch to create the 'ocean' (stamping the ship underneath first) and added a tag next to the knot.  Clap clap - challenge 1 complete!
     Challenge 2 was called 'Get Nauty' - anything nautical themed (so I technical could have entered all three of my creations thus far) but you got extra bonus points if you made something 3D, so I scoured my pantry for lifesavers to play off of the 'You're a lifesaver' sentiment but found none (EH! - HEY), so instead I used my MFT lollipop die cut and some Fancy Pants paper from their 'Down By The Shore" to create this little thank you treat with a Tootsie lollipop inside:
I fussy cut the cut lifesaver out and tucked the sentiment underneath and added a little crab eyelet from my stash (GASP - how cute would these be with Lifesaver Lollipops?!!  I wonder if they still make them...).  Challenge 2 - clap clap complete!
     Challenge 3 was a coloring combination based on this picture:
I chose to focus on one of the cute seashorse images from the set to create my own background paper:
The chain links were created with an EK Success edger punch I got on clearance at JoAnn's years ago - cool isn't it?  And I stamped off the ship image twice with Pcific Point ink to give it a subtle effect behind the 'Bon Voyage' sentiment.
     So, those are my first three cards.  There are two more challenges I hope to be able to play along with before the Pajama Party ends - hope you will play along too!  Thanks for stopping by!
~ Crafty Math Chick


Saturday, August 3, 2013

Dare to Get Dirty Challenges - Post 5

Good Morning Friends & Followers!  I hope you have a fun weekend planned.  Here are some more projects I created for the DTGD challenges on SCS.  The first is a little Ghirardelli treat box (tutorial can be found here on SCS - they are WICKED easy to make and recipients have always loved them) that satisfied the requirements of two DTGD challenges:
(please click on the photo for clearer resolution).  Experience has taught me that the easiest way to keep the flap of the box closed is to find some cute image, label or tag (I used one from Stampin' Up's retired 'Cute & Curly' set along with their curly label punch)  and pop it up with foam tape and then thread a piece of twine or ribbon through the space and tie it on top - festive no?  This cute little guy hold 3 Ghirardelli chocolate squares in flavors of your choosing - YUM!  I am also entering this Ghirardellia chocolate box into Moxie Fab World's Holiday Food & Treat Wrap Challenge (they allow entries posted within 4 weeks).
     The next card satisfied the requirements of three DTGD challenges on SCS:
(the inside says 'the more you have, the harder it is to find your keys - LOL!)  I had fun paper piecing the purses from Skipping Stones Design's Birthday Purses set and used a CB 'Houndstooth' EF for a patterned background.  Not sure I love the colors on this one - I had pictured it coming out a LOT differently in my head...  but it satisfies the requirements of the following additional challenges as well:
     Thanks for looking - should have more for you to see later today (have to make some serious progress on the remaining DTGD challenges - there are 42 total and I have only completed 20 of them so far, EEK!)  Wish me luck!
~ Crafty Math Chick